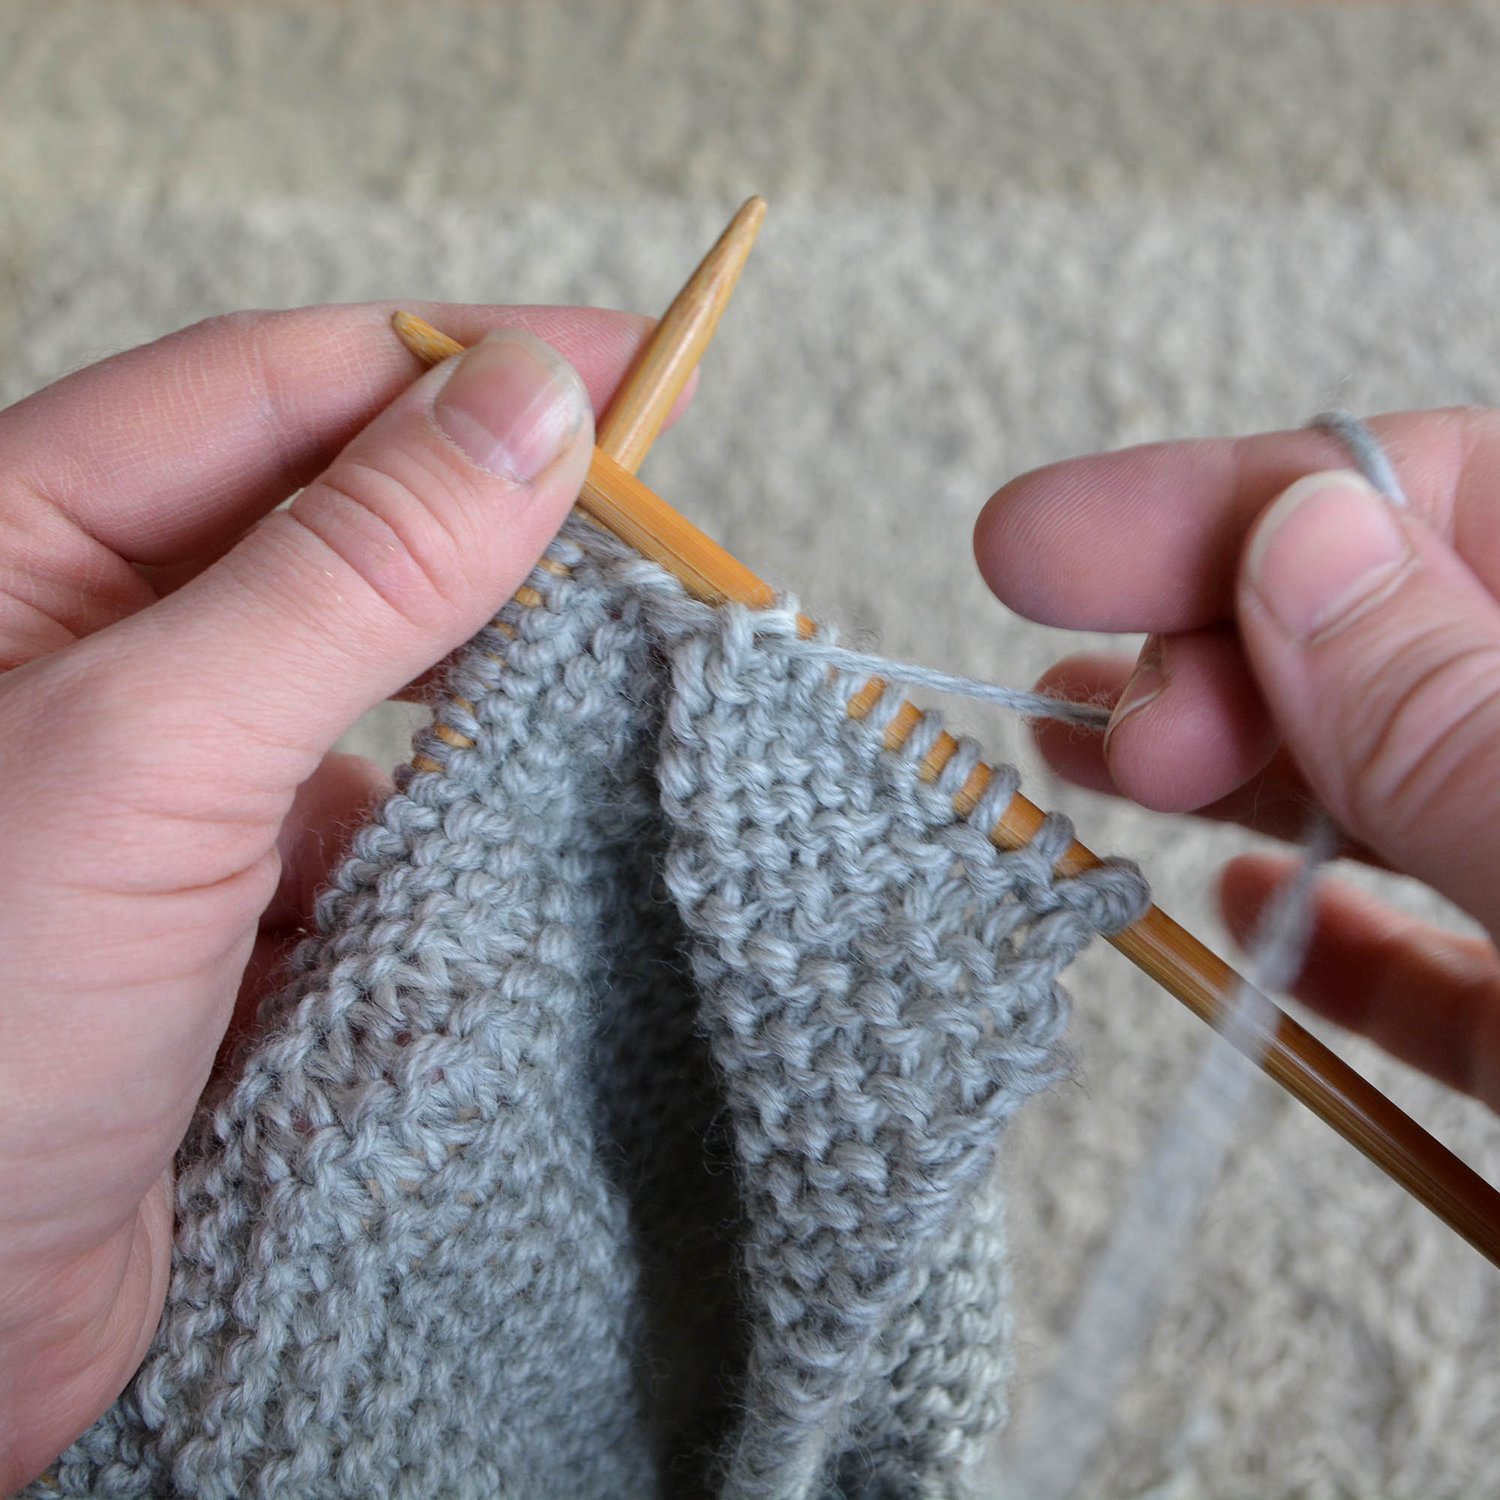
Your Cart
Loading
Pin: How to Work a Purl Stitch.

Purl Stitch

Make “the other knitting stitch” in Continental or American style.


Purling is working a knit stitch in reverse, so the bump faces you and the V is on the back. That may not make sense now, but it will after you have worked a few rows of alternating knit and purl stitch and see how each side of the fabric looks.


Continental Style holds the working yarn in the non-dominant. American Style holds the yarn in the dominant. These are colloquially known as picking and throwing, respectively, for the type of action they require. Picking is easier on the hands and can be done much faster once you are proficient.


Note: This tutorial also appears in my How to Knit series.

Video Tutorial

How to Do It

Basic Principle:


With the working yarn in front, you will be using two needles to create a series of loops, which are the foundation for the stretchy properties of knit fabric.

Rules of Formation

Choose whether you want to try the Continental or American style of holding your yarn, then get to work learning the purl stitch.


Whether you’re working in Continental or American style, the purl stitch has the same rules of formation:

  • Working yarn (the yarn you’re making new stitches with) goes in front of the needles
  • Working needle (in dominant hand) is inserted into the first stitch on the non-working needle from tip end to back end through front leg of stitch
  • Working yarn goes from the tip end of the non-working needle to the back end, top to bottom between the needles
  • Finished stitch should have the leg of the stitch that’s closest to your dominant hand in the front of the working needle


Continental-Style Purling

In Continental Style, the working yarn is held in your non-dominant hand. Holding it in such a way as to achieve correct tension is key. Please read Holding the Yarn.


If you would prefer to hold the yarn in your right hand, read the American (or English) Style Tutorial below.

Step 1

Step One

Hold working yarn* in front of needles. Unless this is your first stitch on the row, the yarn will be coming from the working needle (the one in your dominant hand you are working onto) and going to your non-dominant hand, which is how you maintain tension. Keep it taut.


*Working yarn means the yarn you are creating new stitches with, as opposed to the tail end at the beginning of your cast on row. If you have wrapped your hand properly for Continental-style knitting, it will be going in front of the non-working needle from the last stitch on your working needle to your wrapped hand OR from the first stitch on the non-working needle (if this is a new row).

Step 2

Step Two

Keeping the working yarn in front of your work, insert the working needle into the front leg of the first stitch on the non-working needle from the tip end to the back end (toward the other stitches in the row). (Righties: Your working needle will be going from right to left. Lefties: Your working needle will be going from left to right.)


Working needle should be in front of the non-working needle.

Step 3

Step Three

Use non-dominant hand index finger to move the working yarn down between the needles from the tip end of the non-working needle toward the back end and from top to bottom. (Righties: From right to left; Lefties: From left to right.) Keep taut.

Step 4

Step Four

Keep needles at right angles to each other. Use tip of working needle to draw working yarn through the stitch away from you toward the far side of work.

Step 5

Step Five

Use your working needle to draw the original stitch off the non-working needle, keeping a finger from the non-dominant hand on the other stitches to prevent them coming off too.

Step 6

Step Six

You have now created a new purl stitch.


American-Style Purling

In American (also known as English) style, the working yarn is held in the right hand. To create proper tension, pull on the yarn after wrapping. Please read Holding the Yarn.


If you would prefer to hold the yarn in your right hand, read the Continental-Style Tutorial above.

Step 1

Step One

Hold working yarn in front of needles, keeping taut. Unless this is your first stitch on the row, the yarn will be coming from the working needle and going to your dominant hand, which is how you maintain tension.

Step 2

Step Two

Keeping the working yarn in front of your work, insert working needle into front leg of first stitch on non-working needle from outside (near the non-working needle tip) to inside (toward the other stitches in the row) in front of non-working needle. (Righties: Your working needle will be going from right to left. Lefties: Your working needle will be going from left to right.)

Step 3

Step Three

Use dominant hand to move yarn between needles from tip end of working needle toward the back end and from top to bottom. (Righties: From right to left; Lefties: From left to right.) Keep taut.

Step 4

Step Four

Keep needles at right angles to each other. Use tip of working needle to draw working yarn away from you through the stitch toward the far side of work.

Step 5

Step Five

At this point, you have a new stitch on the working needle coming from the original stitch on the non-working needle.

Step 6

Step Six

Use your working needle to draw the original stitch off the non-working needle, keeping a finger from the non-dominant hand on the other stitches to prevent them coming off too.


You have now created a new purl stitch.

If you're working through the How to Knit tutorial, return to the main index here:

Talena Winters wears a textured scarf and smiles at the camera.

About My Secret Wish Knitting

Hi! I’m Talena Winters (a.k.a. the Yarn Mermaid).

I started My Secret Wish Knitting in 2010 to empower and delight knitting heroes like you who want to elevate your knitting and make magic with yarn. When I’m not concocting new yarn potion recipes, I’m creating story magic as a fantasy and romance author and fiction editor (at talenawinters.com). I live with my family and pets in the Peace Country of northern Alberta, Canada, where sweater weather lasts at least nine months a year and my closest neighbours are bears and wood nymphs.


This website is a labour of love by a team of one (me!). If you found value here, please support the effort by purchasing a pattern. If you want more knitting magic, check out my community events and newsletter in the Knitting Circle. We’d love to have you!