Your Cart
Loading
Pin: Knit Cast On

Knit Cast On

Great cast-on for beginner knitters!

The Knit Cast On is an excellent project starter to create firm, stable edges. And since it uses the basic knit stitch to add the loops you need to continue knitting, it’s a perfect “first cast on” for beginner knitters. (Optionally, you could start with Long Tail Cast On.)

Learn this simple technique for beginning your knitting projects and start casting knitting magic today!

Notes:

  • Make sure to make it loosely, or your cast on edge will be narrower than the rest of your work.
  • This cast on creates a firm, stable edge, so don't use it for edges that need to stretch. (If you’re working on a stretchy edge, I recommend the Super Stretchy Cast On.)
  • To get started, you’ll need a slip knot. See my tutorial for How to Make a Slip Knot for more.

How to Do It

Basic Principle:

You will be creating a cast-on edge by knitting into the previous stitch and then returning the new stitch to the needle holding the work.

Steps

Text included in the images is written out below each step to make this Low Vision Accessible. Instructions on the images are for right-handed people. Instructions in the written text is non-hand specific.

Step 1

Step One

Create a slip knot and place it on a needle. Tighten, but not too firmly.

Place needle with slip knot in non-dominant hand. Hold the needle so the knot stays on the bottom of the needle.

(I usually grasp the tail of the knot in the third and fourth fingers of my dominant hand, keeping my other two fingers and thumb on that hand free for working. This should work even if you knit American style instead of Continental like me.)

Keep your working yarn (the ball end) behind the needle with the slip knot.

Step 2

Step Two

With your working needle in your dominant hand, insert it into the slip knot through bottom of stitch from the non-dominant wrist side outward, behind non-dominant needle. (Righties: from left to right. Lefties: from right to left.)

This is easiest if you hold the non-working needle so it is pointing almost directly away from you to give you easy access to the near side of the stitch.

Step 2

Step Three

The two needles should now look like an X with the working needle (in the dominant hand) stuck through the loop behind the other needle (non-dominant hand). The working yarn (ball end) should be coming from the knot at the bottom of the slip knot behind the two needles, and should be pulled taut.

(Note: The pictures show Continental style knitting. If you knit American style, the yarn won’t be being held up behind the needles as pictured, but when you do the next step, you will need to move it up behind the needles to execute it.)

Keep the knot of the slip knot pulled to the lower edge of the needle.

Step 4

Step Four

Keeping yarn taut, move it between the two crossed needles from the non-dominant wrist side outward. Pull yarn down between the needles.

(For American style: You will first move the yarn around behind the back needle, then execute this step. Make sure the yarn passes between the two needles from the side closest to your non-dominant hand outward.)

Pinnable Pillow Cover
On Sale
CAD7.00
CA$7.00
Added to cart

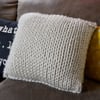
Add instant coziness to your home with this fast-finish statement pillow!

This super-simple pillow cover uses jumbo-weight yarn for a project so fast, you could finish it in the same binge-watching session you started it in. Plus, have bragging rights on Pinterest by tomorrow!

PROJECT LEVEL: Basic or Beginner

Digital download includes:

  • PDF (standard) - best for printing or for sighted knitters
  • PDF (Screen Reader Accessible Large-Print) - best for Print Challenged knitters and reading on phones
  • EPUB (eBook) - best for anyone who wants reflowable, resizable text

See “Accessibility” for more information about file types.

About Design

Construction

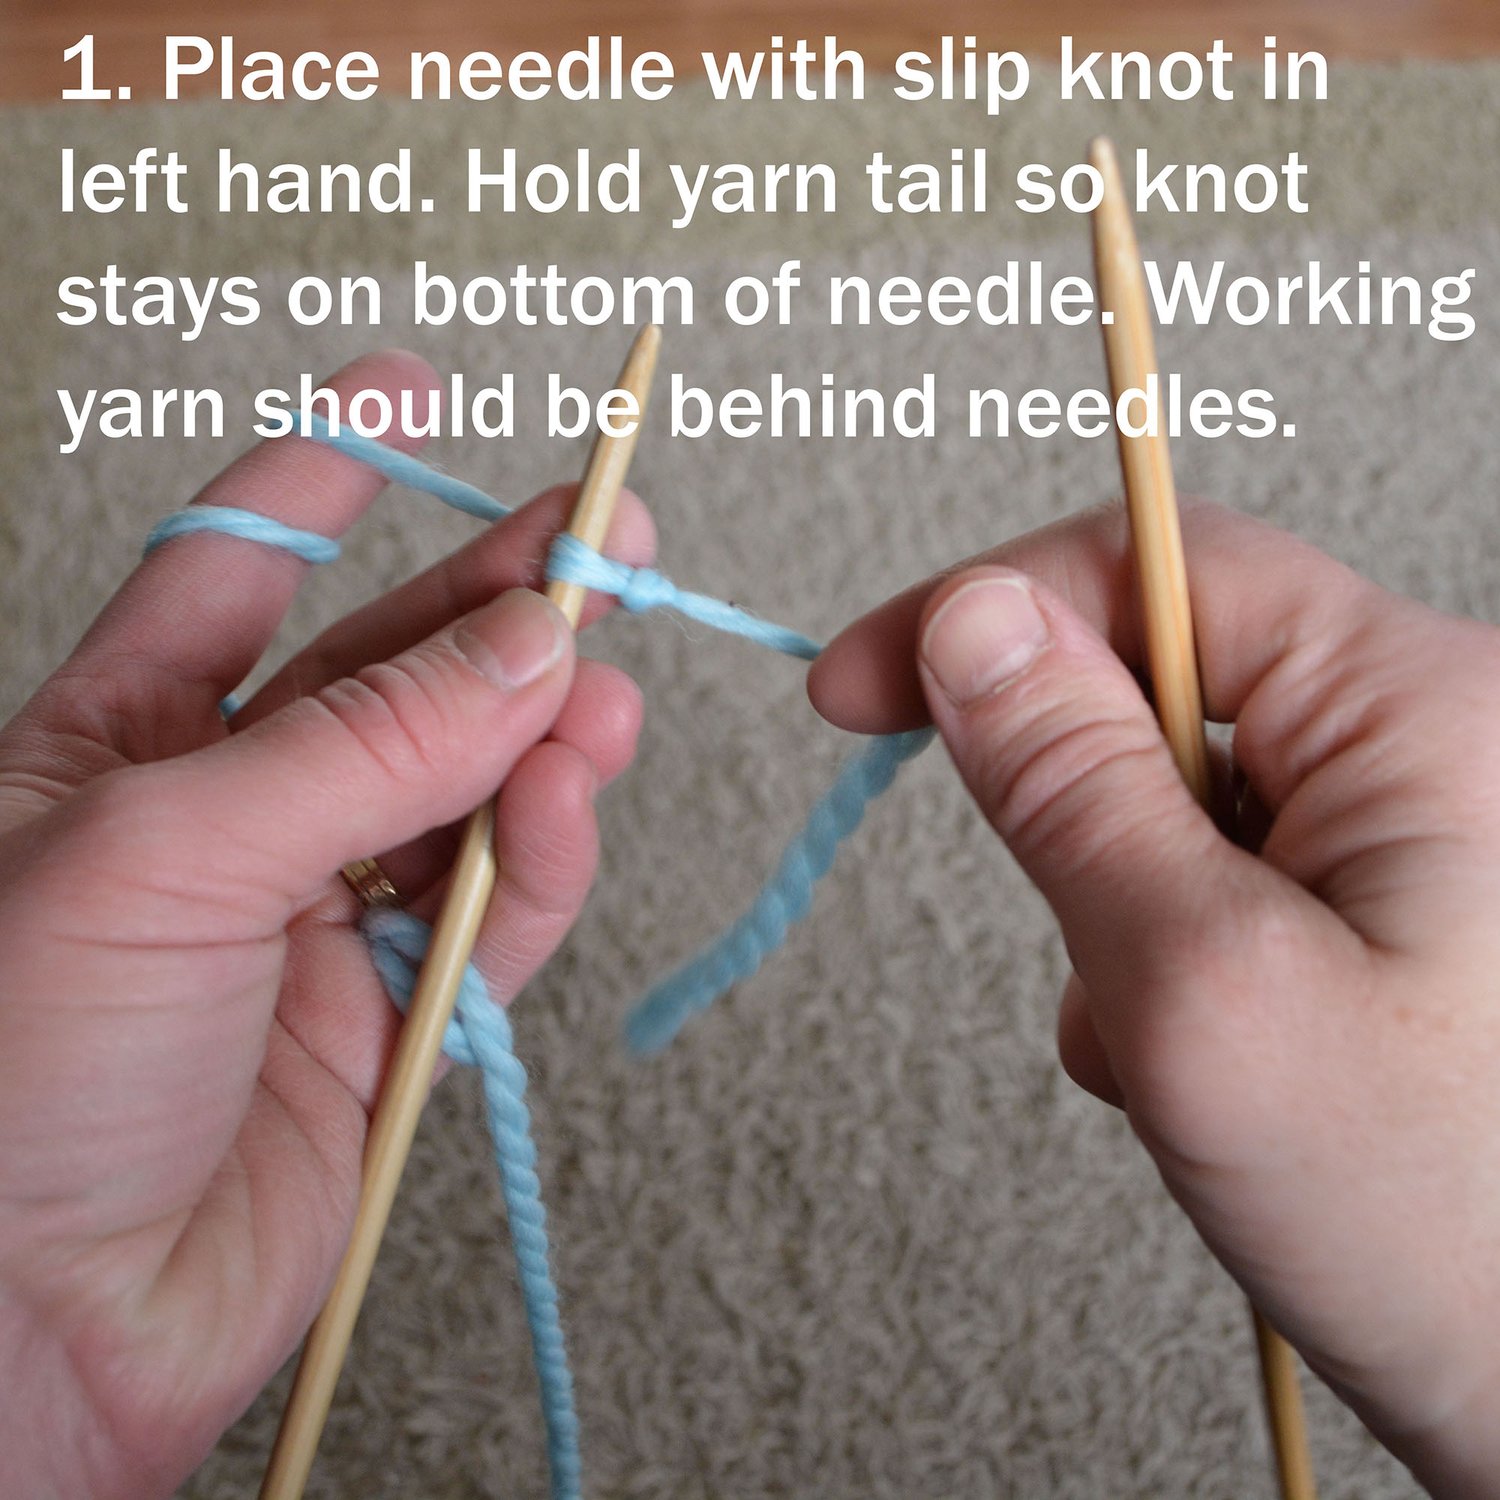
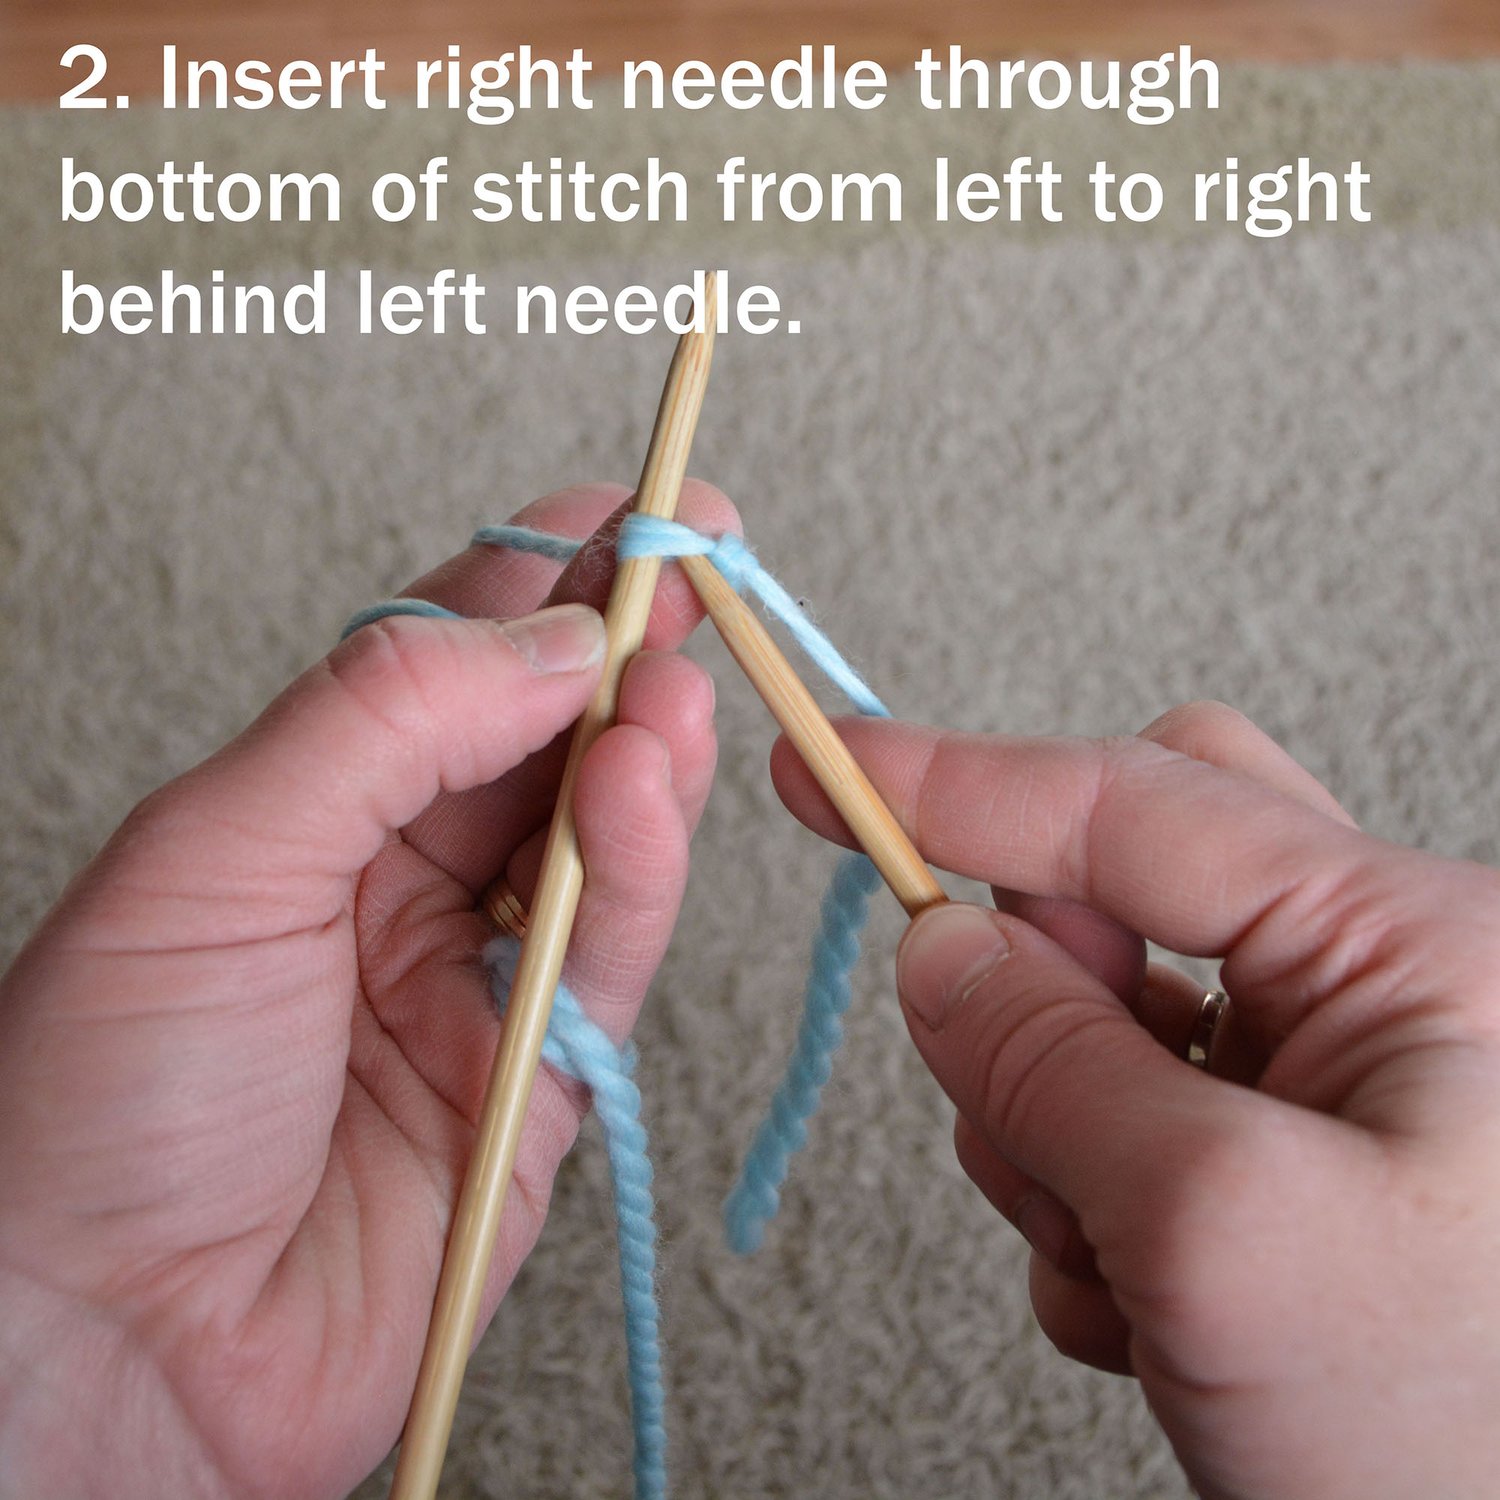
Pillow cover is cast on along the bottom edge, then worked back-and-forth until the end. If Provisional Cast On was used, stitches are grafted using Kitchener Stitch. If Long-Tail Cast On or Knit Cast On were used, stitches are bound off and the beginning and end are seamed together, one side is seamed, then the form is insert and the other side is seamed.

Size

Will fit a pillow form that is 20 by 20 inches (or 50 by 50 cm).

Supplies

Yarn

2 skeins jumbo-weight yarn with 59 metres in 300 grams (or 64 yards in 10.58 ounces).

Approximate yardage: 117 metres (or 128 yards).

Needles

  • 15.0 mm (US 19) straight needles (at least 12 inches [or 30 cm] long is best).
  • Optional: largish crochet hook for Provisional Cast On and scrap yarn at least 100 inches (or 2.5 metres) long.

Notions

  • Yarn needle.
  • 20 x 20 inch (or 50 x 50 cm) pillow form.

Gauge

14 stitches and 21 rows = 12 inches (or 30 cm) over stockinette stitch knit flat.

About Samples

Cream Sample:

Bernat Mega Bulky, a 100% acrylic jumbo-weight yarn with 59 metres in 300 grams (or 64 yards in 10.58 ounces) that knits up to 5 stitches in 4 inches (or 10 cm) over stockinette stitch on size 19.0 mm (US 35) needles.

  • Colourway: Linen

This yarn has been discontinued.

Suggested substitute:

Lion Brand Wool-Ease Wow!, a 100% acrylic jumbo-weight yarn with 60 metres in 240 grams (or 60 yards in 8.47 ounces) that knits up to 5 stitches in 4 inches (or 10 cm) over stockinette stitch on size 19.0 mm (US 35) needles. This yarn is less dense, but the gauge is exact. Since the yardage is similar, you should need the same number of skeins to complete your project.

Techniques & Resources

Skills you will need:

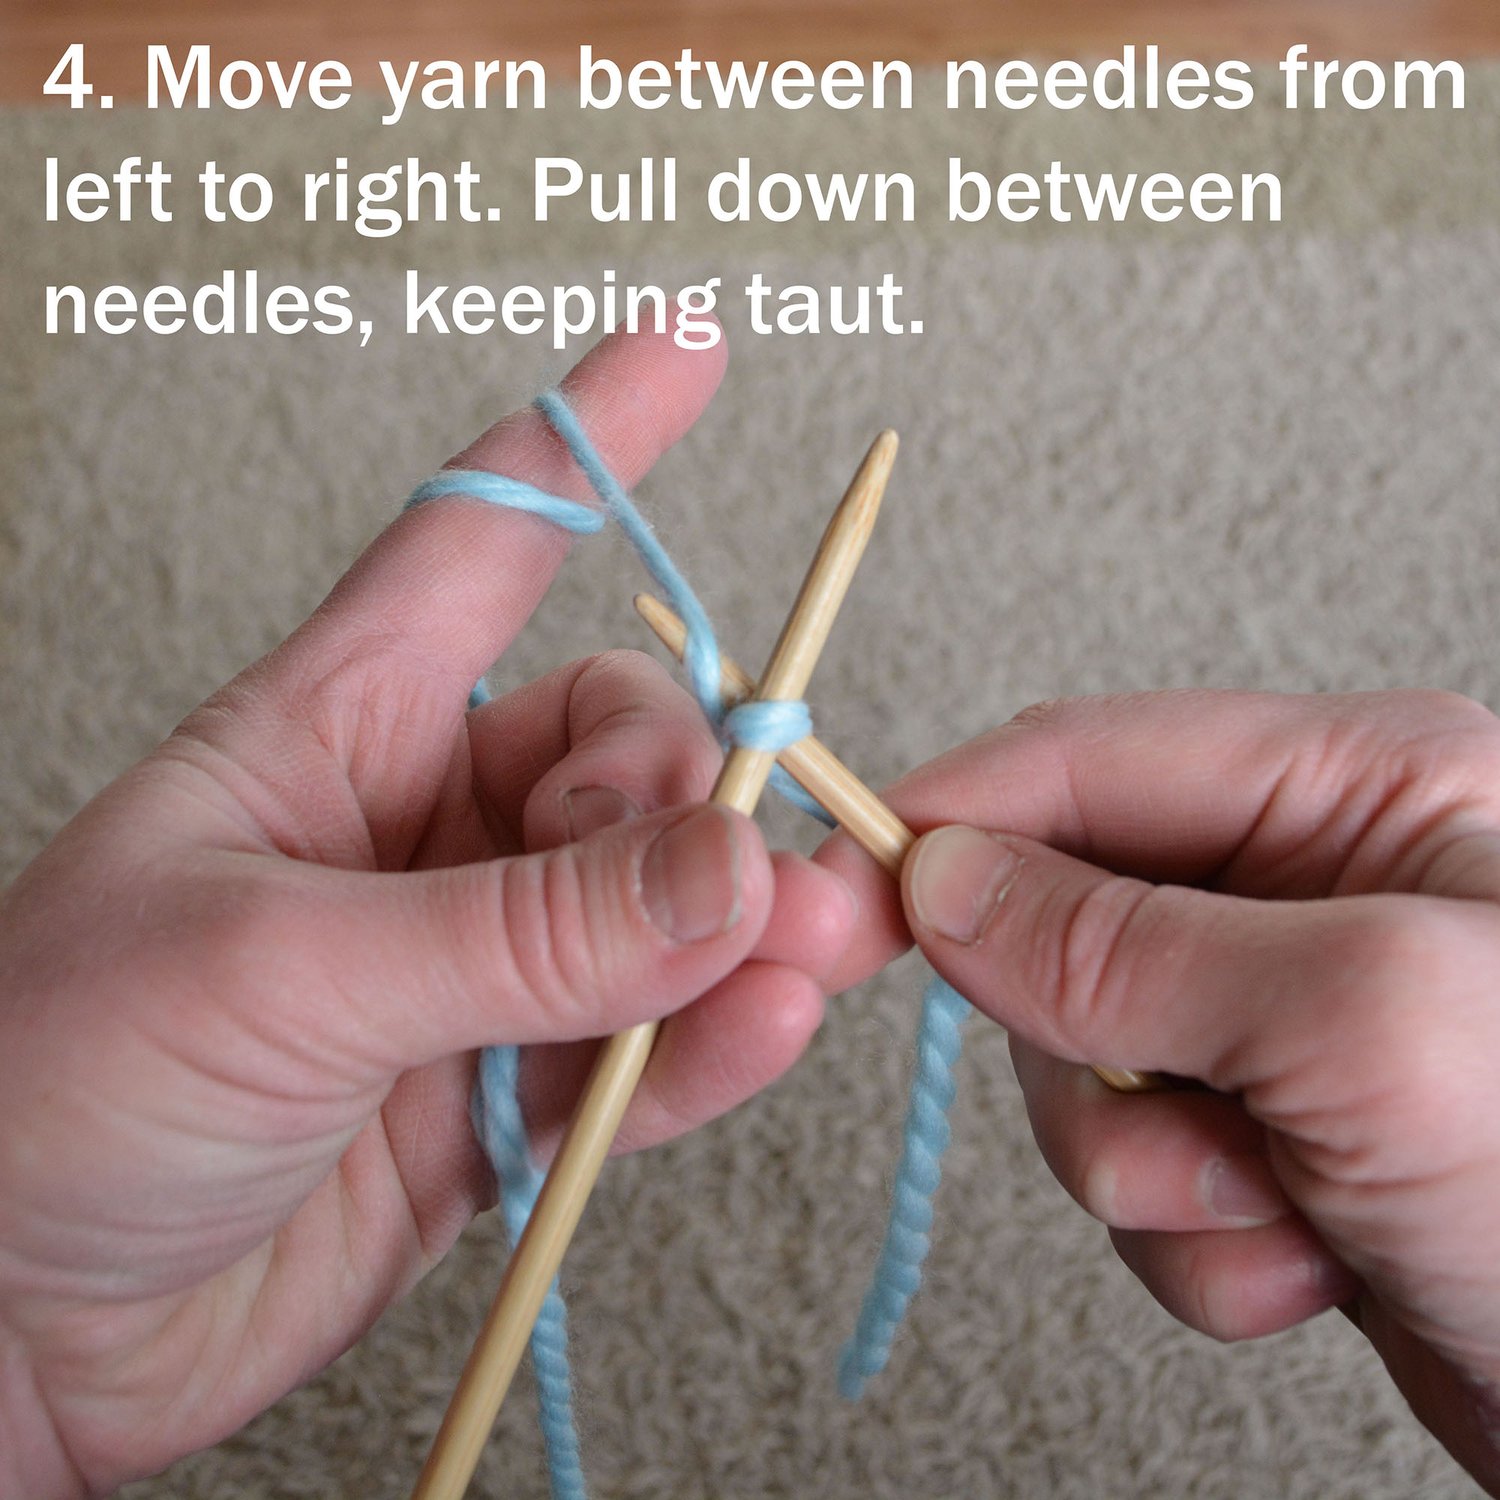
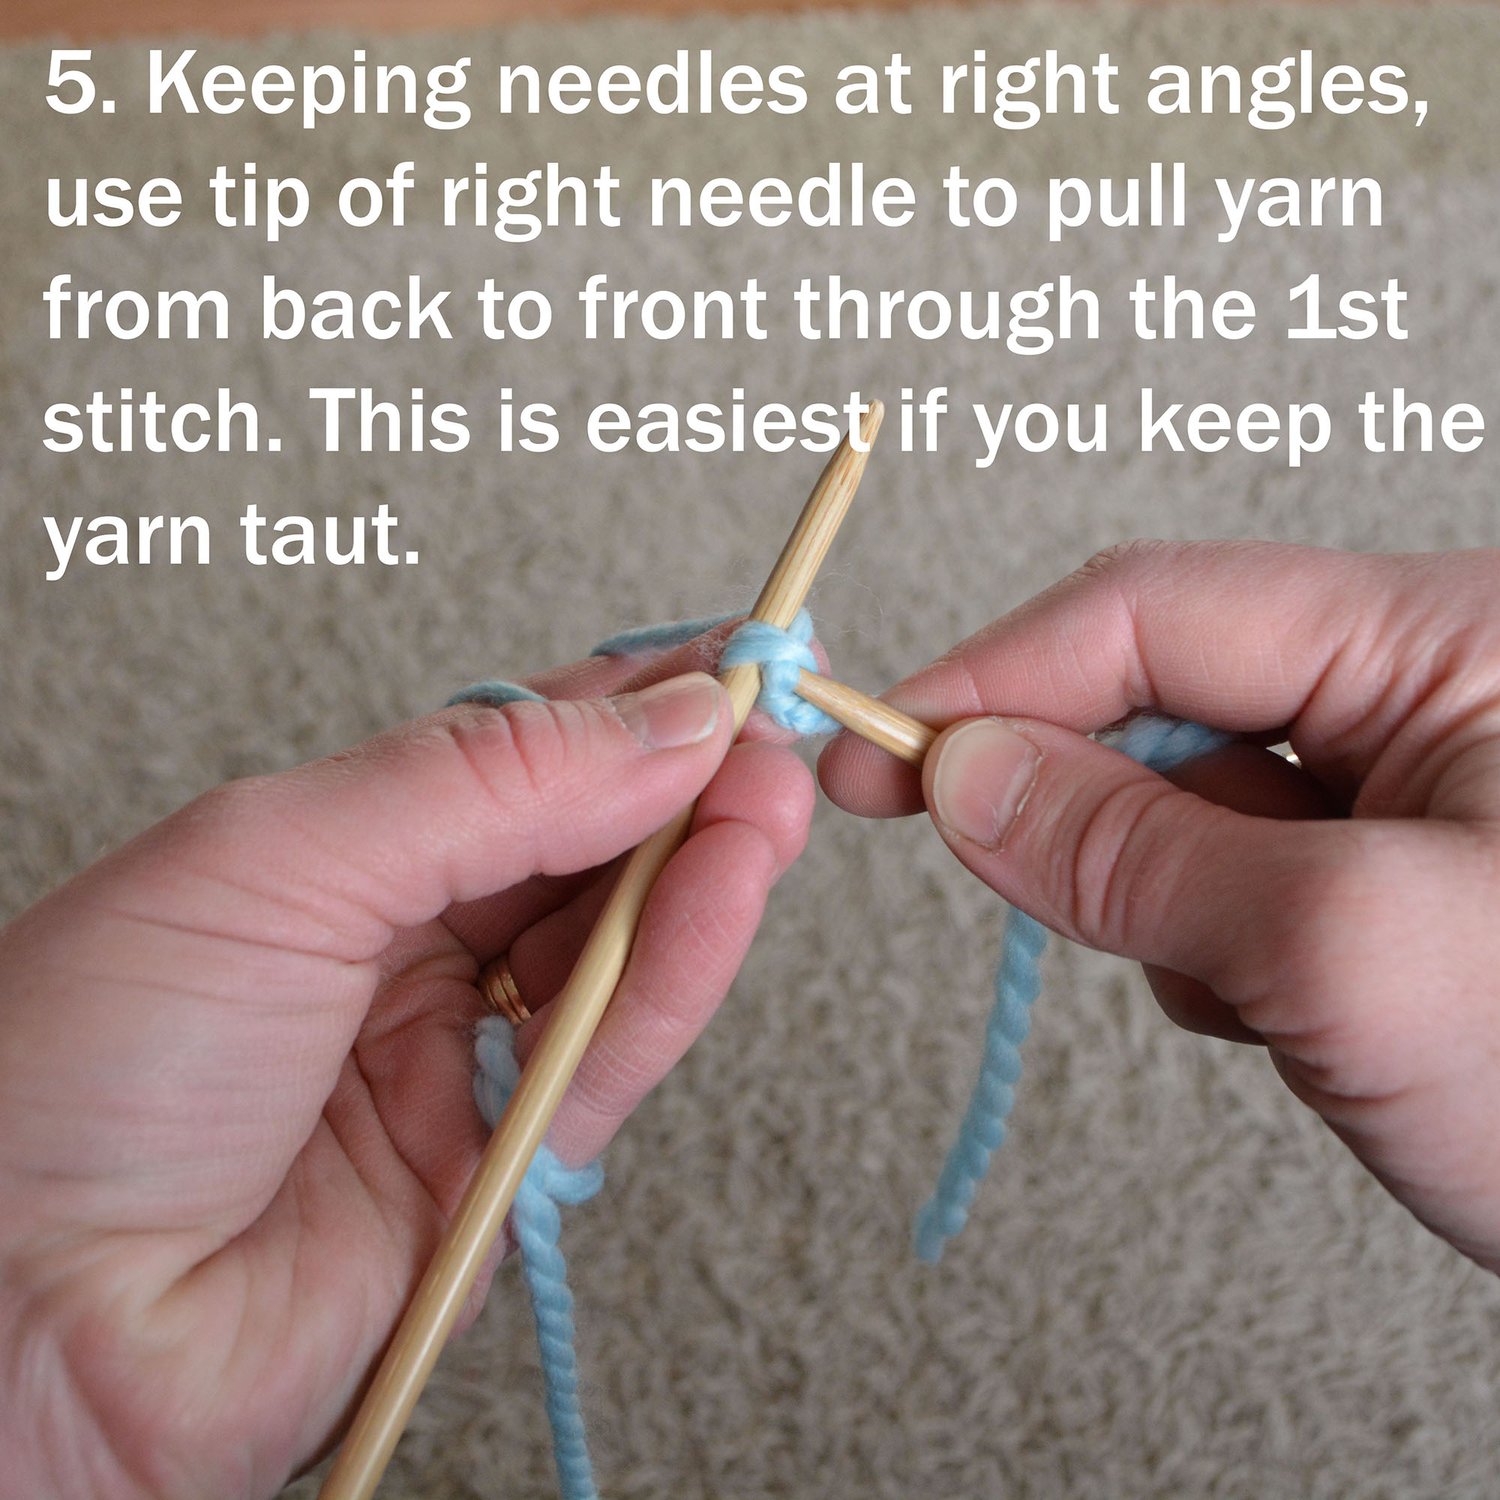
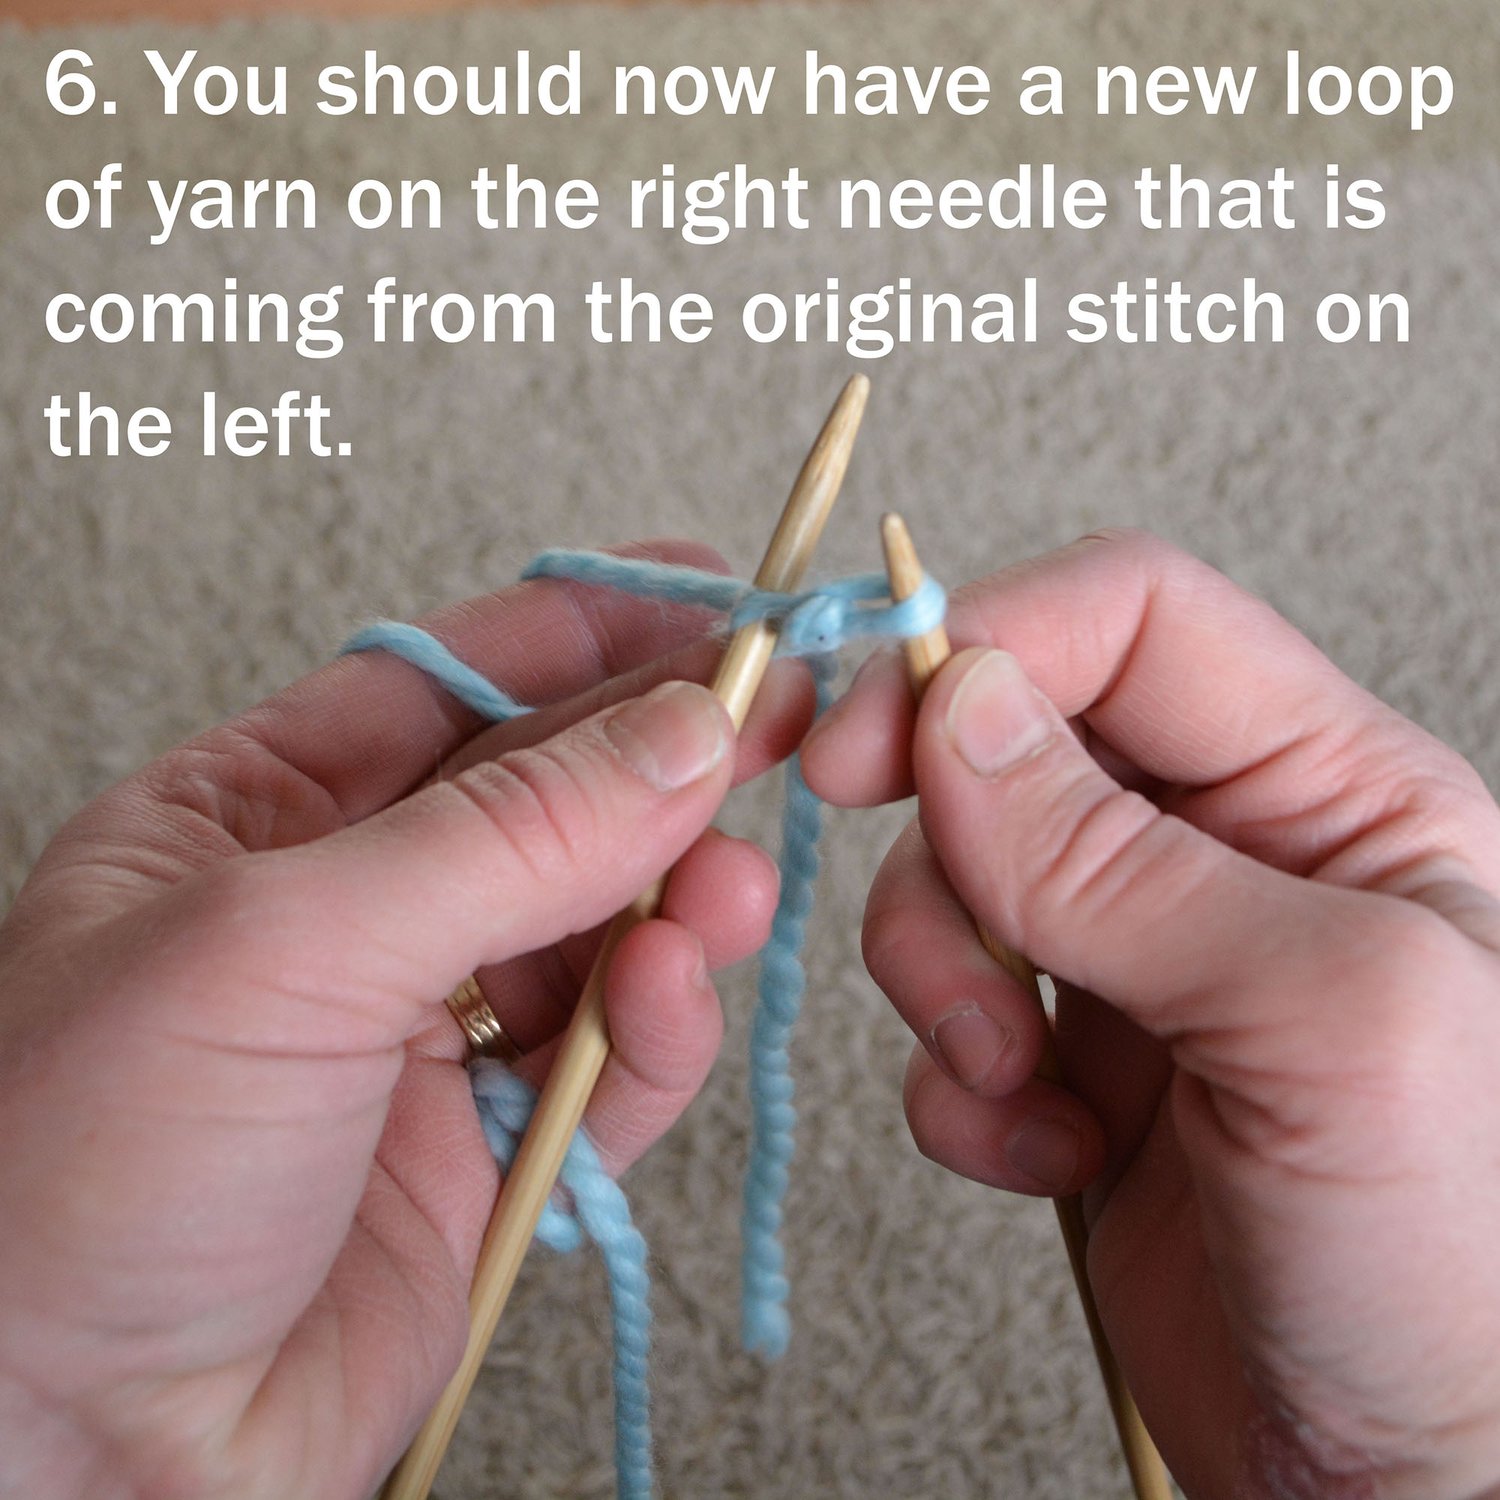
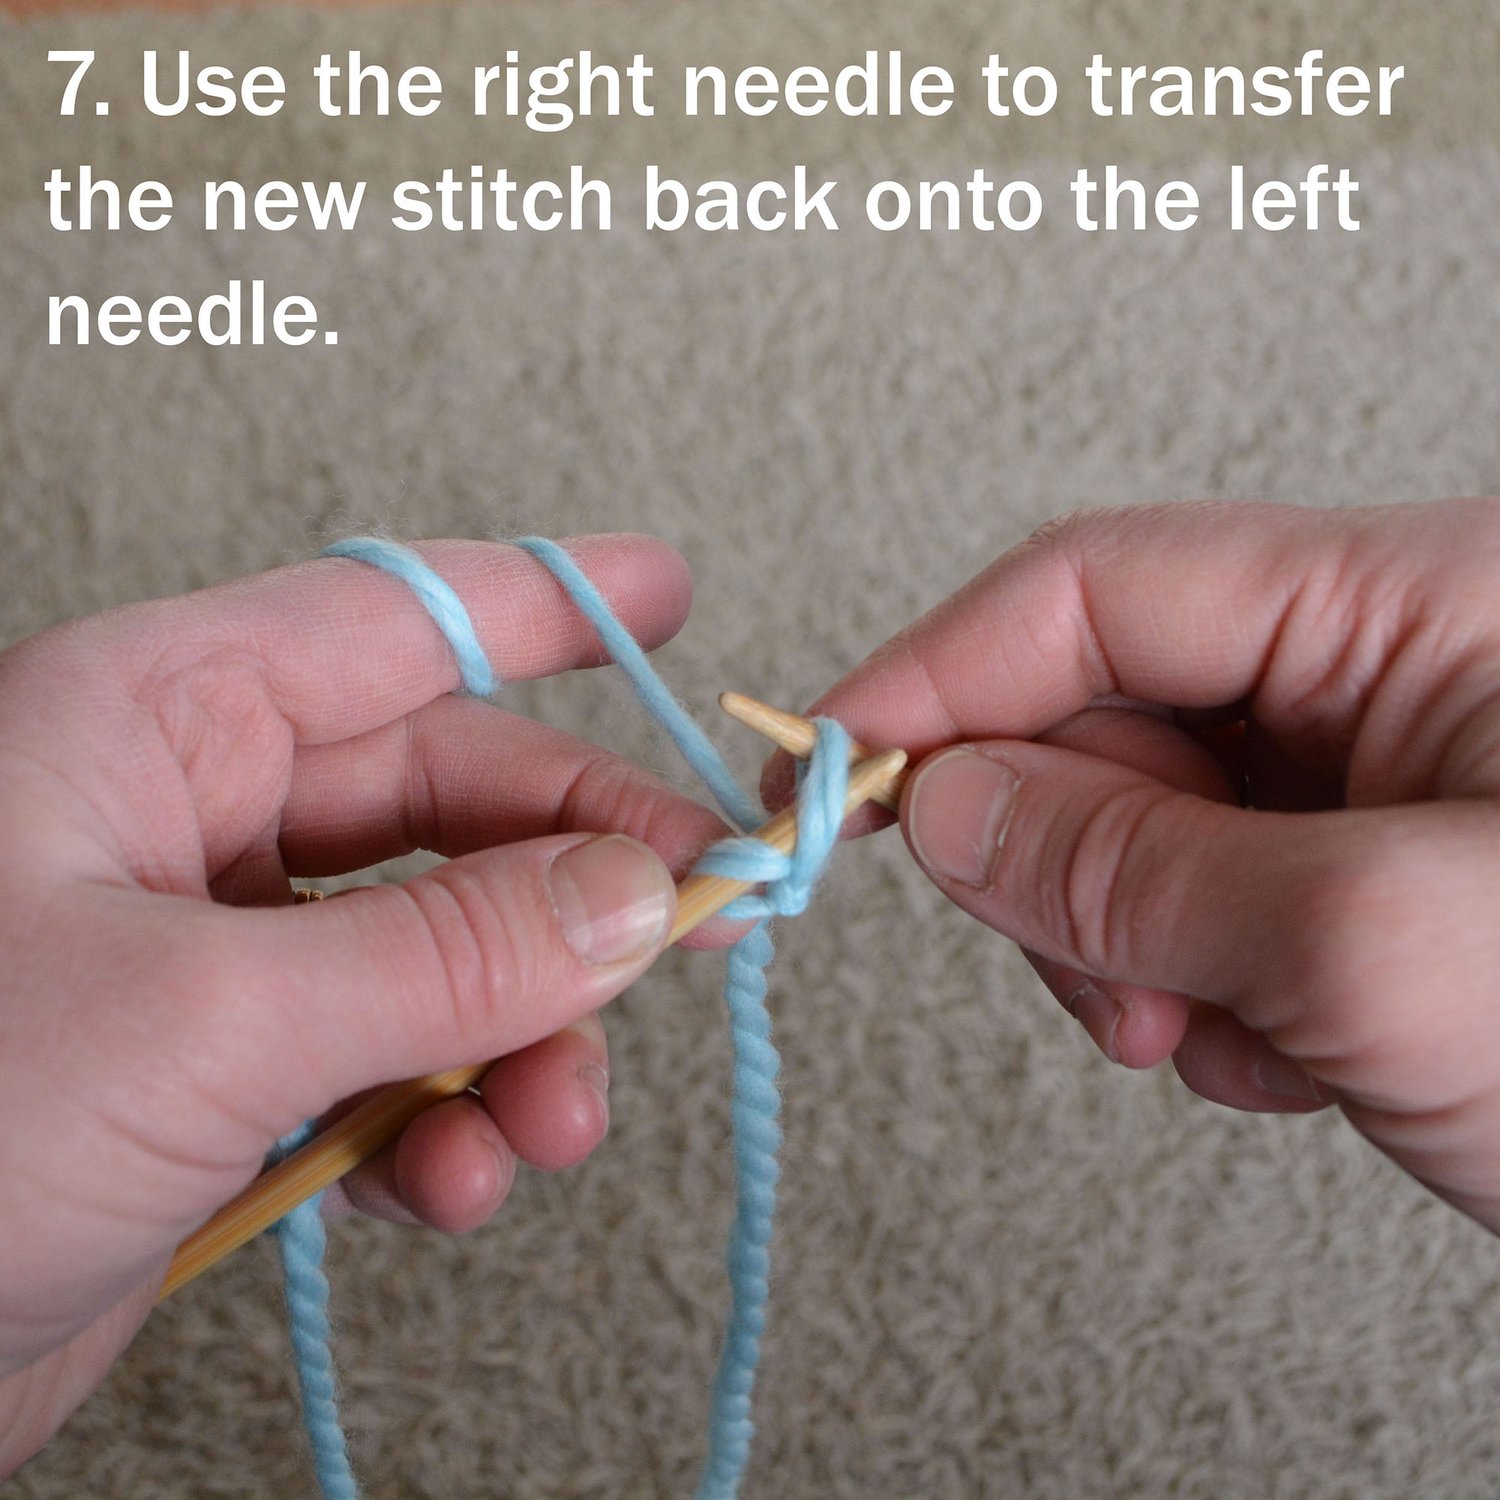
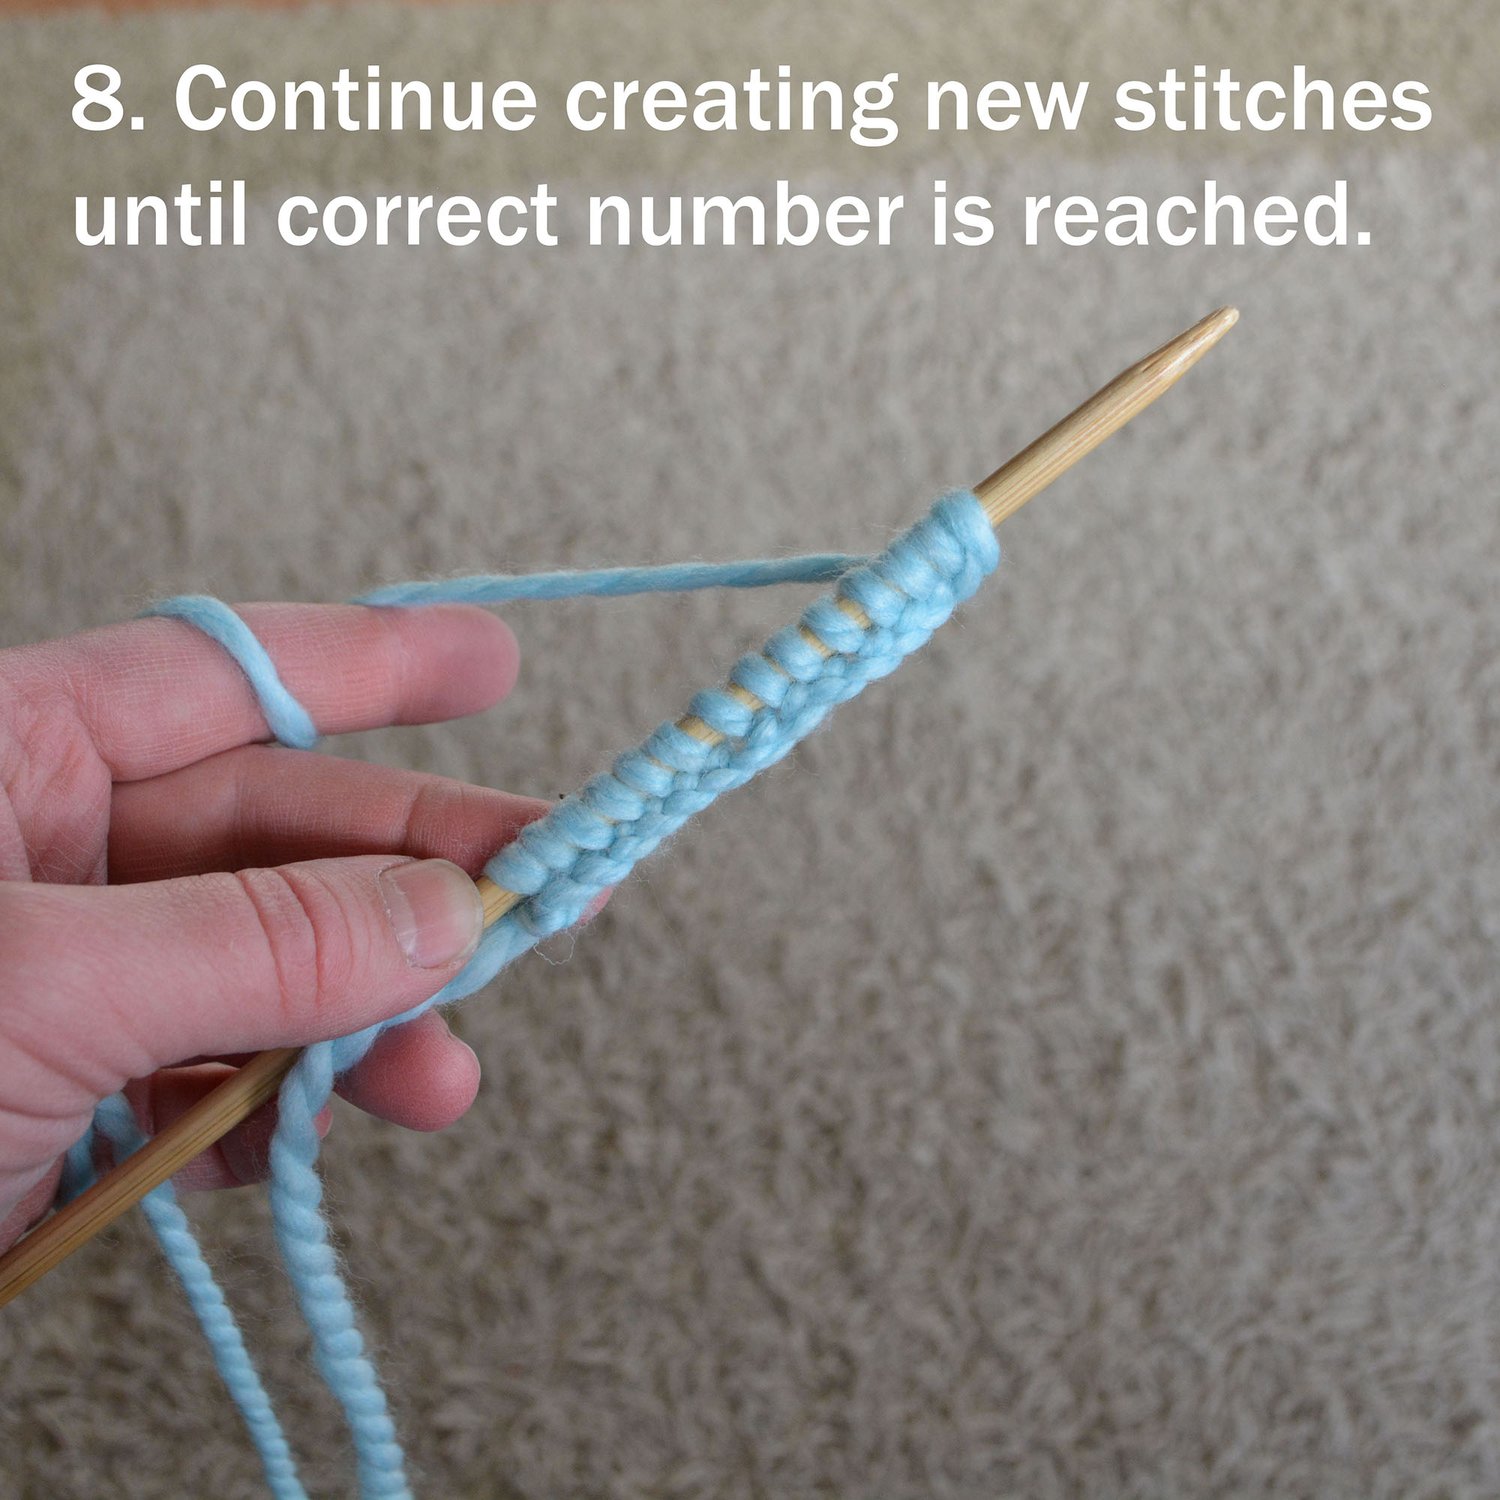
None, persay. This would make a good beginner pattern if you learn well from instructional videos. How to knit and purl are not described in this pattern, but can be found on my website under “How to Knit”. Links to the following tutorials are included in the pattern.

Techniques used:

Included resources:

  • A comprehensive list of links to online tutorials on my website for necessary skills. Tutorials are screen-reader accessible, with instructions relayed fully in text, and also include videos and downloadable photo tutorials.
  • Full glossary

Publishing Information

Release Date: 2016

Most recent revision: June 2023

Publisher: My Secret Wish Publishing

Knitting pattern type: Single Design Option

Project type: Pillow Cover

Page Count (Bookmarked PDF): 5

Page Count (Large Print PDF): 26

ISBN (eBook): 978-1-989800-35-5

ISBN (Bookmarked PDF): 978-1-989800-37-9

ISBN (Large Print SRA PDF): 978-1-989800-36-2

COPYRIGHT AND LICENSING NOTICE:

This pattern is copyright My Secret Wish by Talena. Your purchase of this pattern gives you the right to use it for personal, non-profit use only. To license the pattern to use for profit, please e-mail me for permission. You do NOT have the right to print the pattern for other people (unless they reside in your household) or to transfer the digital file to any other person. This pattern may not be sold, copied, or distributed in any way.

Update History

June 8, 2023:

  • Revised formatting of PDF to align with current template style
  • Clarified language where necessary
  • Converted PDF to be screen reader accessible
  • Updated URLs for new store and social links
  • Created Screen Reader Accessible Large Print and ePUB versions
You will get a ZIP (8MB) file
Step 5

Step Five

Keeping needles at right angles and keeping working yarn taut, drag tip of working needle across bottom of other needle to bring working yarn back through the loop toward the front, creating a new loop on the working needle.

Step 6

Step Six

You should now have a new loop of yarn on the working needle that is coming from the original loop you dragged it through on the other needle.

Make sure this loop is not too tight. You can tighten it up on the next step, if necessary.

Step 7

Step Seven

Transfer the new stitch from the working needle onto the other needle. (Righties: Onto the left needle. Lefties: Onto the right needle.)

Use your middle finger on your non-dominant hand to prevent the previous stitch from being absorbed into the new one while you tighten the new stitch, allowing a slight gap to remain between the new stitch and the previous one. You have just cast on one new stitch.

You can let go of the previous stitch once you have inserted your needle into the new one to create your next cast-on stitch.

Step 8

Step Eight

Repeat from Step Two until the correct number of cast-on stitches has been reached.

If you’re working through the How to Knit tutorial, return to the main index here:

Talena Winters wears a textured scarf and smiles at the camera.

About My Secret Wish Knitting

Hi! I’m Talena Winters (a.k.a. the Yarn Mermaid).

I started My Secret Wish Knitting in 2010 to empower and delight knitting heroes like you who want to elevate your knitting and make magic with yarn. When I’m not concocting new yarn potion recipes, I’m creating story magic as a fantasy and romance author and fiction editor (at talenawinters.com). I live with my family and pets in the Peace Country of northern Alberta, Canada, where sweater weather lasts at least nine months a year and my closest neighbours are bears and wood nymphs.

This website is a labour of love by a team of one (me!). If you found value here, please support the effort by purchasing a pattern. If you want more knitting magic, check out my community events and newsletter in the Knitting Circle. We’d love to have you!